論文から実装へ:スクラッチ開発者のためのAIエージェント入門
 この記事をシェアする


はじめに
こんにちは、データサイエンティストの芹澤です。 最近は生成AIに関する案件に取り組んでいます。
2022年にChatGPTが登場してから今日まで、生成AIや大規模言語モデル (Large Language Model; LLM) に関する話題は盛り上がりを見せ続けていますね。その中でも、2025年はAIエージェント元年になると言われるなど、AIエージェントが一つホットワードになりつつあります。MicrosoftのAzure AI Agent ServiceやAWSのAgents for Amazon Bedrockなど大手がAIエージェントの開発ツールを続々と公開し、それらに関する記事も多く見られるようになりました。ただ、それらツールの基礎となっている技術・手法について触れられている記事はあまり多くありません。
本記事では、AIエージェントとはそもそも何なのか、現在普及しつつあるAIエージェントで多く使われている基礎技術や最新の研究分野はどのようなものがあるのか、AIエージェントはどのような構成で、どう実装されるのかについて、論文を追いながら紹介したいと思います。
AIエージェントの歴史と研究分野
AIエージェントは要求に対し、自律的にタスクをこなし、達成することができるAIシステムのことを指します。
自律的にタスクをこなすエージェント自体は、LLMが登場するより前から学術界・産業界で研究が行われてきました。ただし、これらは閉鎖環境での限られた知識を持つエージェントを訓練して限られたタスクを実行させるもので、オープンな環境で人間のようにタスクをこなすようなイメージとはかけ離れたものでした。ところが、近年LLMが登場したことで人間のように意思決定をしてタスクをこなすことができるようになり、AIエージェントの研究も大きく進歩しました。
LLMの登場後のAIエージェントの研究は多彩な分野で行われており、例えば以下のようなものがあります。
■Agent Framework:AIエージェントの最適フレームワークに関する研究
■プロファイル・メモリ・計画・自己修正:後述のAIエージェントの構成要素に関する研究
■安全性:AIエージェントの行動・発言に対する安全性の研究
■継続的な対話:AIエージェントとユーザの継続的な対話を実現するためのインタラクション的研究
本記事では、後半でSingle Agent FrameworkとMulti Agent Frameworkの代表的な例を紹介します。
AIエージェントの構成
現在のLLMベースのAIエージェントは複雑になりつつあり、それらをいくつかの構成要素に切り分けて整理した構造フレームワークが複数提案されています。その中でも有名なものの一つが、「A survey on large language model based autonomous agents」という論文で提案されている以下の図のような構造です。
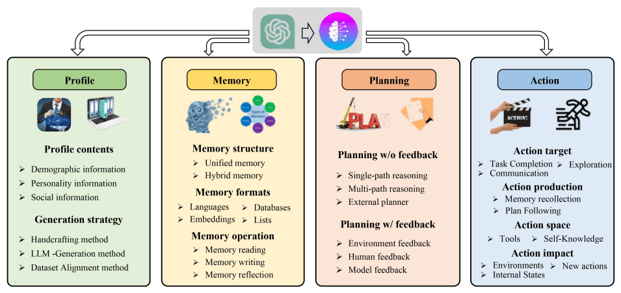
A survey on large language model based autonomous agents, Fig. 2: A unified framework for the architecture design of LLM-based autonomous agent
ここでは、AIエージェントシステムの構成をProfile、Memory、Planning、Actionの4つの構成要素に切り分けています。
Profileでは、エージェントの属性・役割をプロンプトによって決定します。性別や年齢、口調などの人物特性や、専門家、開発者といった役割を与えることで、タスクに合った行動を行えるようにします。
Memoryでは、Agentの存在する環境から取得した情報を記録し、行動の決定に用います。記録方法としては、自然言語のままプロンプトを保存する方法、テキストを埋め込みベクトルで保存する方法、データベースとして保存する方法、配列形式で保存する方法などがあります。人間の記憶には一時的なもの (short-term memory) と長期的なもの (long-term memory) がありますが、AIエージェントシステムでも同様に扱います。short-term memoryでは自然言語での保存などが多く用いられますが、long-term memoryではプロンプトの量が膨大になるため、埋め込み表現やデータベースのような記録方法を用いることが推奨されています。
Planningでは、タスクをシンプルかつ細かいタスクに分解して、実行しやすくします。例えば「LLMの現状について教えて」とユーザから渡されたざっくりとした要求をそのまま実行しようとすると、誤った行動やハルシネーションの原因になります。そこで、「LLMが登場してから今日までの歴史について調査し、報告する」のような形で要求に向けた行動を細かいタスクに細分化し、実行していくことで要求に沿った行動を取れるようにします。
最後に、Actionでは計画に沿って実際に行動し、その結果を取得します。
シングル型AIエージェントとマルチ型AIエージェント
前章では、AIエージェントがどのような構成に切り分けられるかについて紹介しました。これらの構成をベースとして、AIエージェントシステムは図の通りシングル型とマルチ型に分けることができ、マルチ型はさらにVertical Architecture (垂直構造) とHorizontal Architecture (水平構造) に分けることができます。この構造と特徴について、「The Landscape of Emerging AI Agent Architectures for Reasoning, Planning, and Tool Calling: A Survey」という論文でまとめられているので紹介します。

アーキテクチャと特徴
シングル型
シングル型AIエージェントは名前の通り1つのエージェントによって構成され、ProfileとMemoryに基づく推論、Planning、Actionを単独で実行します。AIエージェントによる要求達成においては、適切な計画と自己修正を行えることが重要となり、行動に対する自己評価とそれを踏まえた効果的な計画を立てる能力が低い場合、膨大なタスクを計画してしまったり、修正し続けて実行が終わらない無限の実行ループに陥ることもあります。そのため、特にシングル型では自己修正に関する研究も多くなされています。
マルチ型
マルチ型AIエージェントは2つ以上のエージェントによって構成され、使用される言語モデルは同一の場合や異なる場合もあります。各エージェントはそれぞれ独自のペルソナを有しており、それぞれに与えられた役割をこなします。さらに、各エージェント間の関係は垂直構造と水平構造 に分けることが出来ます。
垂直構造では1つのリーダーエージェントが存在し、他のエージェントがリーダーに報告していく形で構成されます。リーダー以外のエージェントはリーダーのみと通信するアーキテクチャもあれば、各エージェント間でも会話を共有するアーキテクチャもあります。
水平構造では全てのエージェントが平等に扱われ、タスクに対してグループディスカッションを行う形式でタスクを進行します。コラボレーションやフィードバック、グループディスカッションが要求達成のカギとなるようなタスクにおいて用いられることが多くあります。
シングル型とマルチ型どちらを使用すべきか
シングル型AIエージェントとマルチ型AIエージェントでは、それぞれ向いているタスクがあり、達成したい要求に応じて最適なアーキテクチャを構成する必要があります。
シングル型AIエージェントはタスク過程で使用するツールが少なく、プロセスが明確に定義されているタスクに最適とされています。シングル型ではマルチ型の課題である他のエージェントからのフィードバックが不十分であったり、エージェント間の無駄なやり取りが発生するということが生じません。
マルチ型AIエージェントは複数のペルソナからのフィードバックが要求達成に役立つタスクに最適とされています。前述の通り、マルチ型ではエージェント間の無駄なやり取りが発生するリスクがありますが、垂直型アーキテクチャを採用することで、各エージェントは自分の役割に徹するため、ある程度解決できるとされています。
各エージェントの代表的な実装例
シングル型AIエージェント”ReAct”
シングル型AIエージェントの有名なフレームワークとして、”ReAct”というものがあります。ReActは2022年に公開された「ReAct: Synergizing Reasoning and Acting in Language Models」という論文で提案されたAIエージェントで、2024年12月時点で1,700件以上引用されている代表的なシングル型AIエージェントの一つです。
エージェントのフローとしては、
1.まずユーザが要求をAIエージェントに投げかけます。
2.AIエージェントには実行できるツールを保持しており、渡されたタスクに対して保持しているツールを使うべきかを判断します。
3.ツールを使う場合、ツールの実行で得られた結果をAIエージェントに返し、その内容を元にユーザへの回答を提示します。 ツールを使わない場合は、エージェントが持つ知識を元に回答をユーザへ提示します。
RAGシステムとも似ていますが、AIエージェント自身がツールを使用するかどうかを自律的に判断して回答を作るという点が大きく異なります。
ここからは実際に実行する場合のスクリプト例をご紹介します。実装においては、LangGraphのReActのページが参考になります。事前に pip install langgraph でLangGraphをインストールしておきましょう。
まず、使用するLLMのセッティングを行います。API KEYはスクリプトに直書きでも良いですが、安全性を考えるならば.envファイルに記述することをオススメします。
import os
from langchain_openai import ChatOpenAI

os.environ["OPENAI_API_KEY"] = "{API KEY}"
model = ChatOpenAI(model="gpt-4o", temperature=0)続いて、AIエージェントが必要に応じて呼び出すツールを作成します。今回は例として、Open-Meteoという天気予報APIを使って東京と岩手の天気予報を提供するツールを作成します。
import requests
from langchain_core.tools import tool

@tool
def get_weather(city: Literal["tokyo", "iwate"]):
    """Use this to get weather information."""
    if city == "tokyo":
        url = "https://api.open-meteo.com/v1/forecast?latitude=35.6895&longitude=139.6917&daily=weather_code&forecast_days=1"
        response = requests.get(url)
        data = response.json()
        return "weather_code: " + str(data["daily"]["weather_code"][0])
    elif city == "iwate":
        url = "https://api.open-meteo.com/v1/forecast?latitude=39.4207&longitude=141.0916&daily=weather_code&forecast_days=1"
        response = requests.get(url)
        data = response.json()
        return "weather_code: " + str(data["daily"]["weather_code"][0])
    else:
        raise AssertionError("Unknown city")

tools = [get_weather]
次にgraphの構築です。 graphの構築はたった1行で出来ます。 どのようなgraphが出来たか画像で確認することも1行ででき、今回の場合、図のようにgpt-4oのagentに対して天気予報のtoolが1つの非常にシンプルなgraphが構築されていることが分かります。
from langgraph.prebuilt import create_react_agent
from IPython.display import Image

# graphの構築
graph = create_react_agent(model, tools=tools)
# グラフの可視化
png_data = Image(graph.get_graph().draw_mermaid_png())
with open("output_graph.png", "wb") as f:
    f.write(png_data.data)
 今回のAIエージェントの構成
最後に、プロンプトを設定して実行してみましょう!inputsで今回解決したい課題を記述します。
def print_stream(stream):
    for s in stream:
        message = s["messages"][-1]
        if isinstance(message, tuple):
            print(message)
        else:
            message.pretty_print()

inputs = {"messages": [("user", "what is the weather in iwate")]}
print_stream(graph.stream(inputs, stream_mode="values"))
================================ Human Message =================================

what is the weather in iwate
================================== Ai Message ==================================
Tool Calls:
  get_weather (call_tibfyyAQoRBPEQKQYbgHWq7J)

 Call ID: call_tibfyyAQoRBPEQKQYbgHWq7J
  Args:
    city: iwate
================================= Tool Message =================================
Name: get_weather

weather_code: 63
================================== Ai Message ==================================
The weather in Iwate is currently experiencing light rain showers.inputs = {"messages": [("user", "who built you?")]} のようにToolを使っても判断できない情報が渡されると、以下のようにToolを使わずにLLMが持っている情報から回答を作成します。
================================ Human Message =================================

who built you?
================================== Ai Message ==================================

I was developed by OpenAI, a research organization focused on creating and promoting friendly AI for the benefit of all humanity.
マルチ型AIエージェント”CAMEL”
"CAMEL"は2023年のNeurIPSで発表された「CAMEL: Communicative Agents for "Mind" Exploration of Large Language Model Society」で提案されたAIエージェントで、480件以上引用されている代表的なマルチ型AIエージェントの一つです。
このモデルでは、AIエージェント同士のロールプレイング形式でタスクを進行していきます。 AIエージェントは3つ用意され、それぞれ「タスク具体化エージェント」、「ユーザエージェント」、「アシスタントエージェント」として役割を与えられます。 ロールプレイングは以下の流れで進行していきます。
1.人間が大まかな要求を入力します (人間が介入するのはここのみ)
2.タスク具体化エージェントが、人間から渡された要求を具体的なタスクに変換します
3.具体的なタスクに対し、ユーザエージェントがリーダーのような役割となり指示を出し、アシスタントエージェントが回答する形で対話を行い、タスク解決を目指します
各エージェントには論文著者が試行錯誤の上でプロンプト設計をしており、表のようなインセプションプロンプトが与えられています。 具体的には、以下のような工夫がなされています。
・アシスタントエージェントがユーザエージェントに対して指示しないよう明確に指示
・指示と応答が一貫性を保つようにフォーマットを固定化
・無限ループや役割の混乱を防止するための制約を盛り込む
.png?width=600&height=588&name=4%20(1).png) CAMEL: Communicative Agents for "Mind" Exploration of Large Language Model Society, Figure 2: Inception Prompt of AI Society Role-Playing. This shows the task specifier prompt, assistant system prompt, and user system prompt which are used for studying the AI society scenario.
CAMEL: Communicative Agents for "Mind" Exploration of Large Language Model Society, Figure 2: Inception Prompt of AI Society Role-Playing. This shows the task specifier prompt, assistant system prompt, and user system prompt which are used for studying the AI society scenario.
CAMELの実装は、CAMELのGithubページにサンプルが載っています。 Google Colabに用意されているNotebookを使う方法と、自分のローカル環境で試す方法があり、とりあえず試してみたい場合にはColabを使うのが簡単かと思います。
今回はローカル環境で試す方法をご紹介します。CAMELは pip install camel-ai でインストールすることが出来ます。実行スクリプトは以下の通りで、OpenAI API KEYとtask promptをそれぞれ修正することで、実行することが出来ます。
注意!:CAMELはAIエージェント同士が会話を行うため、1回の実行あたりのAPI利用量が非常に大きくなります。スクリプト内”chat_turn_limit”で会話回数制限をするなどしてAPI使用量を抑えることを推奨します。
# =========== Copyright 2023 @ CAMEL-AI.org. All Rights Reserved. ===========
# Licensed under the Apache License, Version 2.0 (the “License”);
# you may not use this file except in compliance with the License.
# You may obtain a copy of the License at
#
#     http://www.apache.org/licenses/LICENSE-2.0
#
# Unless required by applicable law or agreed to in writing, software
# distributed under the License is distributed on an “AS IS” BASIS,
# WITHOUT WARRANTIES OR CONDITIONS OF ANY KIND, either express or implied.
# See the License for the specific language governing permissions and
# limitations under the License.
# =========== Copyright 2023 @ CAMEL-AI.org. All Rights Reserved. ===========
from colorama import Fore

from camel.societies import RolePlaying
from camel.utils import print_text_animated
import os

os.environ["OPENAI_API_KEY"] = "{API KEY}"

def main(model=None, chat_turn_limit=50) -> None:
    task_prompt = "{解決したい要求を入力}"
    role_play_session = RolePlaying(
        assistant_role_name="Python Programmer",
        assistant_agent_kwargs=dict(model=model),
        user_role_name="Stock Trader",
        user_agent_kwargs=dict(model=model),
        task_prompt=task_prompt,
        with_task_specify=True,
        task_specify_agent_kwargs=dict(model=model),
    )

    print(
        Fore.GREEN
        + f"AI Assistant sys message:\n{role_play_session.assistant_sys_msg}\n"
    )
    print(
        Fore.BLUE + f"AI User sys message:\n{role_play_session.user_sys_msg}\n"
    )

    print(Fore.YELLOW + f"Original task prompt:\n{task_prompt}\n")
    print(
        Fore.CYAN
        + "Specified task prompt:"
        + f"\n{role_play_session.specified_task_prompt}\n"
    )
    print(Fore.RED + f"Final task prompt:\n{role_play_session.task_prompt}\n")

    n = 0
    input_msg = role_play_session.init_chat()
    while n < chat_turn_limit:
        n += 1
        assistant_response, user_response = role_play_session.step(input_msg)

        if assistant_response.terminated:
            print(
                Fore.GREEN
                + (
                    "AI Assistant terminated. Reason: "
                    f"{assistant_response.info['termination_reasons']}."
                )
            )
            break
        if user_response.terminated:
            print(
                Fore.GREEN
                + (
                    "AI User terminated. "
                    f"Reason: {user_response.info['termination_reasons']}."
                )
            )
            break

        print_text_animated(
            Fore.BLUE + f"AI User:\n\n{user_response.msg.content}\n"
        )
        print_text_animated(
            Fore.GREEN + "AI Assistant:\n\n"
            f"{assistant_response.msg.content}\n"
        )

        if "CAMEL_TASK_DONE" in user_response.msg.content:
            break

        input_msg = assistant_response.msg


if __name__ == "__main__":
    main()
ここでは、例として「議事録作成のための音声認識アプリ開発」を紹介したいと思います。task_promptに"Create a speech recognition app for taking minutes"と入力して実行すると、以下のような出力が得られました (非常に長くなるので、序盤の具体化と2往復のやりとりのみを抜粋しています)。
Original task prompt:
Create a speech recognition app for taking minutes

Specified task prompt:
Develop a Python-based speech recognition app that transcribes meeting discussions into structured minutes. Incorporate features like keyword tagging, speaker identification, and the ability to summarize key points. Ensure the app supports multiple languages and allows users to export minutes in various formats, such as PDF and Word.

Final task prompt:
Develop a Python-based speech recognition app that transcribes meeting discussions into structured minutes. Incorporate features like keyword tagging, speaker identification, and the ability to summarize key points. Ensure the app supports multiple languages and allows users to export minutes in various formats, such as PDF and Word.

AI User:

Instruction: Set up a Python environment with the necessary libraries for speech recognition.
Input: Use libraries such as SpeechRecognition, pydub, and any other relevant libraries for audio processing.


AI Assistant:

Solution: To set up a Python environment for speech recognition, you'll need to install several libraries that will help with audio processing and speech recognition tasks. Below are the steps to create a virtual environment and install the necessary libraries.

1. **Create a Virtual Environment**:
   First, it's a good practice to create a virtual environment to manage your project's dependencies. You can do this using `venv` or `conda`. Here, I'll show you how to use `venv`.

   Open your terminal or command prompt and run the following commands:

   ```bash
   # Navigate to your project directory
   cd your_project_directory

   # Create a virtual environment
   python -m venv speech_recognition_env

   # Activate the virtual environment
   # On Windows
   speech_recognition_env\Scripts\activate
   # On macOS/Linux
   source speech_recognition_env/bin/activate
   ```

2. **Install Required Libraries**:
   Once the virtual environment is activated, you can install the necessary libraries using `pip`. The key libraries for your task are `SpeechRecognition`, `pydub`, and `pyaudio` (for microphone input). You may also want to install `numpy` and `scipy` for additional audio processing capabilities.

   Run the following command:

   ```bash
   pip install SpeechRecognition pydub pyaudio numpy scipy
   ```

   - **SpeechRecognition**: This library provides easy access to various speech recognition engines and APIs.
   - **pydub**: This library is useful for audio manipulation, such as converting audio formats and slicing audio files.
   - **pyaudio**: This library allows you to work with audio input/output streams, which is essential for capturing audio from a microphone.
   - **numpy** and **scipy**: These libraries are useful for numerical operations and scientific computing, which can be helpful in audio processing.

3. **Verify Installation**:
   After installation, you can verify that the libraries are installed correctly by running the following commands in a Python shell:

   ```python
   import speech_recognition as sr
   from pydub import AudioSegment
   import pyaudio
   import numpy as np
   import scipy
   ```

   If there are no errors, the libraries are installed correctly.

4. **Next Steps**:
   Now that you have set up the environment and installed the necessary libraries, you can start developing your speech recognition app. The next steps would involve implementing the core functionalities like
 capturing audio, transcribing it, and structuring the minutes.

Next request.


AI User:

Instruction: Implement a function to capture audio from the microphone and save it as a WAV file.
Input: Use the `pyaudio` library for capturing audio and `wave` library for saving the audio file.


AI Assistant:

Solution: To implement a function that captures audio from the microphone and saves it as a WAV file, we will use the `pyaudio` library for capturing the audio stream and the `wave` library to save the audio data in WAV format. Below is a detailed implementation of the function.

### Step-by-Step Implementation

1. **Import Required Libraries**:
   We need to import `pyaudio` for audio capturing and `wave` for saving the audio file.

2. **Define the Function**:
   We will create a function called `capture_audio` that will handle the audio capturing process.

3. **Set Parameters**:
   We will define parameters such as the format, channels, rate, and chunk size for the audio stream.

4. **Capture Audio**:
   We will open a stream, record the audio, and then stop the stream.

5. **Save the Audio**:
   Finally, we will save the captured audio data to a WAV file.

Here is the complete code for the function:

```python
import pyaudio
import wave

def capture_audio(filename, duration=5):
    """
    Captures audio from the microphone and saves it as a WAV file.

    Parameters:
    - filename: str, the name of the file to save the audio.
    - duration: int, the duration of the audio to capture in seconds.
    """
    # Set parameters for audio capturing
    FORMAT = pyaudio.paInt16  # Audio format
    CHANNELS = 1              # Number of audio channels (1 for mono)
    RATE = 44100              # Sample rate (44.1 kHz)
    CHUNK = 1024              # Buffer size

    # Create a PyAudio object
    audio = pyaudio.PyAudio()

    # Open a stream for audio input
    stream = audio.open(format=FORMAT, channels=CHANNELS,
                        rate=RATE, input=True,
                        frames_per_buffer=CHUNK)

    print("Recording...")

    frames = []

    # Record audio for the specified duration
    for _ in range(0, int(RATE / CHUNK * duration)):
        data = stream.read(CHUNK)
        frames.append(data)

    print("Recording finished.")

    # Stop and close the stream
    stream.stop_stream()
    stream.close()
    audio.terminate()

    # Save the recorded audio to a WAV file
    with wave.open(filename, 'wb') as wf:
        wf.setnchannels(CHANNELS)
        wf.setsampwidth(audio.get_sample_size(FORMAT))
        wf.setframerate(RATE)
        wf.writeframes(b''.join(frames))

# Example usage
capture_audio('output.wav', duration=5)
```

・・・(以下略)
上記をまとめると、以下のように進んでいます。
■task prompt:議事録を取るための音声認識アプリを作成する
■Specified task prompt (タスク具体化エージェント):会議の議論を構造化された議事録に書き起こす Python ベースの音声認識アプリを開発します。キーワードのタグ付け、話者の識別、要点を要約する機能などの機能を組み込みます。アプリが複数の言語をサポートし、ユーザーが PDF や Word などのさまざまな形式で議事録をエクスポートできるようにします。
■Final task prompt (最終タスク定義づけ):タスク具体化と同じ
■AI user:
・手順: 音声認識に必要なライブラリを使用して Python 環境を設定します。 入力: SpeechRecognition、pydub、その他のオーディオ処理に関連するライブラリを使用します。
■AI Assistant
・解決策: 音声認識用の Python 環境を設定するには、オーディオ処理と音声認識タスクに役立つ いくつかのライブラリをインストールする必要があります。以下は、仮想環境を作成し、 必要なライブラリをインストールする手順です。・・・(以下略)
このようにタスクを具体化・定義づけしたのち、ユーザエージェントとアシスタントエージェントの対話が始まります。ユーザエージェントの指示に対してアシスタントエージェントが実装手順とその方法やスクリプトを回答していきます。アシスタントエージェントは、回答が終わると “Next request“と述べ、それに対してユーザエージェントが次の指示を出します。これをユーザが出した要求を達成する (Final taskを完了する) か、chat_turn_limitで指定した回数に達するまで繰り返します。
終わりに
今回は、AIエージェントの概要と構成、代表的な実装をご紹介しました。今後さらに重要な技術となっていくと思われるAIエージェントについて、今回ご紹介したような内容がベースにはあるということを知っていただけると幸いです。
最後にはなりますが、弊社ではKDDIが保有する国内最大規模のユーザデータを対象とした分析や、生成AIを活用した開発などに取り組んでいます。今回紹介した内容や、その他弊社の取り組みに興味がございましたら、ぜひお声がけください。